OK we’ve made it. The Atari Centipede is complete! If you’ve missed the previous installations, you can read them all here.
So what follows, are the final pieces of the jigsaw being sorted out. First up, t-molding. This is the thing that really smartens up a cab, and gives it that finishing touch. I ordered 120 foot of the stuff from t-molding.com – these guys are always reliable, they ship internationally at a very reasonable cost, and the product is top-notch:

The t-molding that came with the cab was in a horrible state, so it had to go. For this job you need a rubber mallet, to hammer in the t-molding into the groove around the edge of both sides of the cabinet:

Top tip: to get the molding around corners, you need to slice triangles into the plastic like this:

And to go around inverted curves without the t-molding popping out, simply cut straight slices into it. That way it sits nice and flush when you hammer it in:

And at the final join, where the ends meet, I like to tap in two small nails to ensure it stays in place:

Hardware next. I reconstructed the marquee area with our newly painted retainers and scrubbed marquee:

Gave the coin door a polish, and screwed it back in:


Voltage testing next. This is an essential “pre-flight” check that you should do if working on an unfamiliar cab:

I’m testing the power brick there which pushes out a variety of DC voltages to various bits of the cabinet that need it. I was getting some weird readings at first, which led me to check continuity on those fuses, and found I had two blown ones. Replaced those with some spares which sorted the problem out. All voltages were within tolerance, so I had a quick peek to check we were getting power:

Yep! Looking good. The marquee lights up. Next up was dropping in the monitor and bolting it in securely, grabbing the PCB and firing up:

She lives! Albeit with a sound problem though – you could barely hear the game playing. This turned out to be a problem on the AR2 board which manages sound. A couple of the amplifiers had failed (TDA-2002’s). I sourced replacements from eBay, and cracked open the soldering iron and replaced both. Sound fixed!


So with that done, I was able to add the final bits to the cab. Here’s our new cardboard monitor bezel being stapled on:

And here she is complete. How about some Centipede arcade porn?
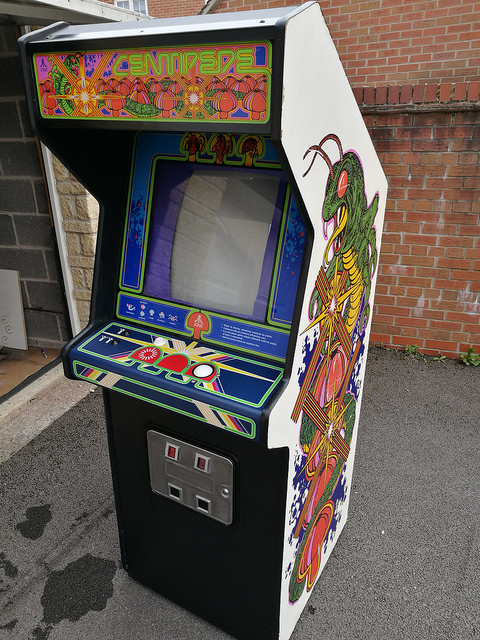


Very pleased with the end result. Here’s some before/after shots of various parts of the cab to give you a better idea of how well this Centipede has cleaned up:


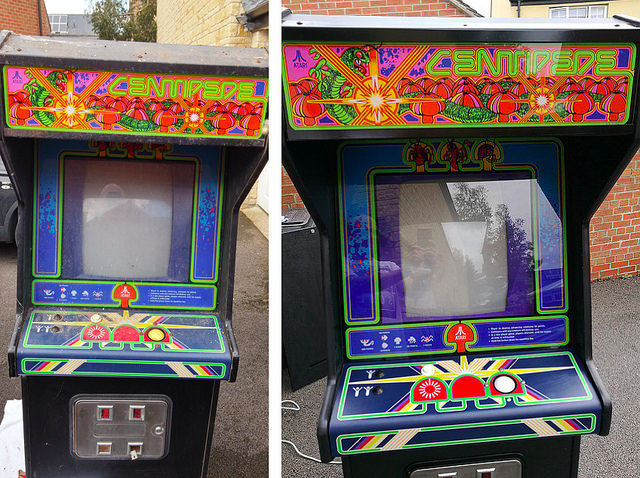

So there you have it. One nice looking Atari Centipede:

So what’s next for the cab? Well I did mention at the start of this restoration that I had no intentions of keeping it. I own a Centipede cabaret model which better suits my needs, so this was put up for sale a few weeks back, and I’m pleased to say it sold quickly, and is now in the hands of its new owner in Nottinghamshire.
Thanks for reading this week. I have lots more restorations on the go – keep an eye out for more on the blog in the coming weeks.
Again, if you missed the whole restoration, you can read it here complete from start to finish.
If you like what you see, I’d appreciate you sharing this article using the buttons below.
Cheers
Tony


Wonderful, wonderful restoration Tony. The end results are eyepopping!
I bet the new owner is made up.
Don’t suppose you have a spare cabaret for sale as well…..
LikeLike
Pimp up your Arcade Machine!
LikeLike
Did you end up leaving the bottom of the cab that you patched up unpainted or did you touch up with white? I can’t tell from the pics.
LikeLike
I left it unpainted for the new owner to decide what he wanted to do.
LikeLike
Thanks! I just picked up a Centipede cab last night thats in a bit rougher shape. Can’t wait to start working on it.
LikeLiked by 1 person
Hi Tony,
I’m building a cabinet with a trackball.
Do you have the exact measures of that ball?
I’m trying to stick to the original size as most as I can.
Thanks and congratulations for your restoring skills!
LikeLike
Centipede trackballs are 2.5″ in diameter. You can buy new drop in replacements if yours is too far gone.
LikeLike
Thank you!
LikeLike