If you’re not familiar with Williams’ Robotron arcade game then you need to seek it out. A cornerstone of classic arcade gaming, it delivers relentless twitch shooter action in absolute spades. This is a game that delivers even today. Frenetic and colourful with sound effects to die for (literally), its gameplay pumps adrenaline through your veins with a vengeance, and has firmly placed its creators, Eugene Jarvis and Larry Demar within the hallowed hall of classic arcade developers. (Gameplay footage here)
The cabinet itself came in three flavours – an upright, a cocktail and a cabaret. All are pretty striking, but my preferred ‘want’ was a cabaret machine. I did own a full USA upright machine once upon a time, and stupidly sold it some time ago – something I’ve always regretted.
I just missed out on a “new in box” cabaret a couple of years back which was a shame (the cab same from the same place as the cocktail table I wrote about a few weeks back). As it happens, the Williams branded Robotron cabaret never made it over here in the UK, but for the uninitiated, here’s what it looks like:

A really striking cab. I like the small form factor and tiny footprint. So given that these things are very rare over on these shores, and never come up for sale, I had to think outside the box a little. Enter a UK Streets Stargate which came up on Ebay. I got my bid in and won. Here’s what turned up:


As you can see, it is based on the shape of the USA Williams cabaret cabs that house the iconic Robotron game (along with Stargate I believe) – sadly, Streets, the UK licencee of Williams games never bothered with side art, so it’s not much of a looker.
It arrived complete, but not working. The previous owner told me he had attempted repairs by literally guessing where wires went. Not the brightest idea. I pulled the monitor out and rigged it up to my Centipede cabinet and managed to get a picture which was something I suppose. So we appear to be good to go on the monitor front. Sadly, nothing else was working.

There will always be opinion on these things, but in my view, given that the only real character to the cab is the marquee, CPO and bezel, I don’t feel too bad about gutting it and changing it totally. The rest of the cab is so bland looking – it’s really the style and shape that has potential. So I got to work on getting everything stripped out.
What was a bonus, was I was able to sell the boards, marquee and control panel, and pretty much got my money back for the total cost of the cab – so I regard this as a freebie, which is always nice, plus, those bits will be re-purposed elsewhere by someone else. That said, I needed to free up as much budget as possible, because getting this to look like an original US game wasn’t going to be cheap. Artwork, paint, boards, wiring, joysticks – the costs were going to start mounting up, as this was going to be the most intensive restoration I had ever undertaken.
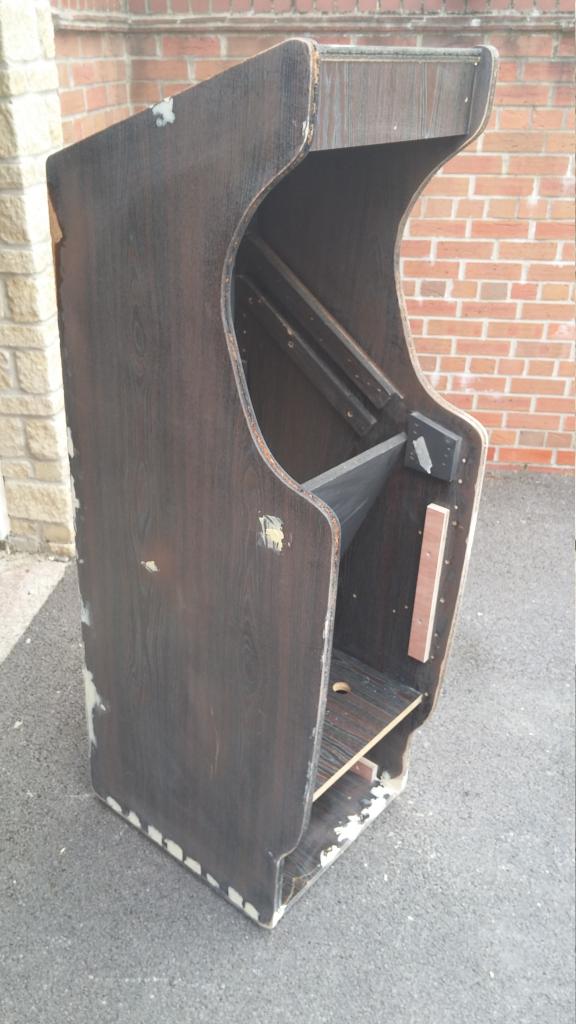
After removing the damaged wood panels at the front which weren’t worth saving, I was left with this shell:

So this is what I’m starting with. As is always the case with Arcade Voodoo 101, it looks all right from a distance. But get up close, and it reveals itself to be a bit of a basket case. The front and back “doors” were all bent out of shape and didn’t close properly. There’s quite a bit of wood damage, especially to the corners. The edges of the cab have taken a few knocks over the years, and some dodgy repairs have been carried out at some point during its life. There’s a distinct “wobble” when you push the side of the cab, so much so, that it will collapse under its own weight if pushed too hard. Making cabs out of particle board is great if the cab is treated well – that doesn’t appear to be the case here though. Dry rot is everywhere. The old girl has had a tough life. Oh dear. Here’s one of the corners:

And I don’t know what’s happened here. This will need sorting – someone’s taken a chunk out of the rear:

But, after a few words of advice (actually a kick up the backside) from a fellow collector over here, who keeps reminding me that “everything is fixable”, I felt slightly better about taking on this mammoth task. So what the hell, let’s have a crack at it. Clearly, this is going to be a big job to take on – I’ve restored a few cabs now, but this is the biggest challenge yet for sure. There is a lot of woodwork to do, which I’m not too confident about at all; also filling, sanding and paint work. Not to mention, artwork, boards, sticks etc, etc, etc. This is almost a “from scratch” build!
Still, no point moping around about it. Let’s make a start. First job was to get down to the local builder’s merchants and get some wood panels cut to size – pretty easy job, and I had nice new wood ready to install where the old damaged stuff was. To prep for that, I got some support beams made up and screwed them in after measuring out where they needed to be. These will act as anchor points for the new wood panels:

These small beams, as well as giving the new panels something to be secured to, will add rigidity to the cab. I used a similar technique on the inside corners which solved the “wobbles”.
Next up, a trip to the local DIY store to pick up some Wet Rot Wood Hardener and Ronseal Wood Filler. We’ll be needing a lot of this stuff:

So after brushing all the exposed damaged wood with the hardener and leaving to dry for a few hours, it was time to break out the filler.
Hate this job. Don’t know what it is about filler, but it always seems to go around the hole you’re trying to fill, rather than in it. Not to mention the mild panic you have thinking about how long you have before it all sets – literally minutes. But after getting into a rhythm of making up small amounts at a time, I got the job done in a couple of hours or so:

Some of the damage required quite a lot of filler; so to ensure a good “key” with the surface wood, I used small 10mm screws, leaving the heads proud. This adds strength to the filler, making a more secure repair, as it gives the filler more surface to grip:

(that’s half way through that particular fill just to show the technique)
There are some areas that I’m not too sure about where I’ve added filler, so there may be more repairs to come where I’ve currently filled, but let’s see how it turns out. So long as everything is solid, I’m not planning on OCD levels of perfection.
Anyway, as messy as it looks, everything is filled, with a good amount of excess (as you can see!), ready for sanding. I’ve got the other wood panels to add, so will do that also to get the cab sanded and prepped for paint.
I should mention parts at this point. I’ve decided to go down the JROK route, and have acquired one of the latest firmware boards ready for install. What is a JROK board I hear you ask? This is a new build of all the Williams games on a single tiny board using modern components, that perfectly replicate the original arcade code. JROK provide an ability to boot the board straight up into the game you want, so it’s ideal for this purpose.

Now, I know I’ve been banging on about authenticity in this blog, but given that this is essentially a reproduction cab, I don’t feel bad at all about using non-original parts. The upside of going down this route, is going to be reliability. The modern JROK will be rock solid – a blessing in this hobby.
Joysticks! Being a twin stick shooter, these need to be good and accurate. I wasn’t convinced that the expense and difficulty of sourcing genuine Robotron sticks was the right thing to do (given the whole thing is a scratch build/repro anyway). I’ve decided to go with a pair of Super Pro Leaf 8 way joysticks from the guys at GroovyGameGear.com over in the USA. These are a modern interpretation of the traditional leaf switch sticks of old. Played with some in the US last year and they are fantastic.

Clearly those shafts aren’t even close to the originals, so I added a pair of Versi-ball adjustable shafts with candy red balltops ot the order. These are fully compatible with the Super Pros, so hopefully we’ll end up with a good result for the controls. I’d really like the controls to be as close to the genuine Robotron experience as possible.

Artwork is ready to be printed – I have vectors of the Control Panel, Bezel and Marquee.
I’ve also have a stencil set for the cabaret-sized US Robotron side art ready to apply paint. Again, ordered from the USA. I’ve not decided yet on whether to roller paint the silver sides and black front or go for spraying.

The positive thing I suppose is given that this is pretty much a “build” it does give me some slack in the process and I don’t have to be too worried about 1000% accuracy – there will be some variables (coin door construction for example). Given that, I’m pretty comfortable using the JROK and modern joysticks.
So once the filler had hardened, I needed to set about sanding. Another horrible job. The dust gets everywhere, but it’s a necessary evil. Here’s how the cab has turned out so far:

Just to give you an idea, here’s the new wood panels placed on the cab:

So that’s where I’m up to so far. Once we get some paint on it, it’ll start to look like a desirable cab again. More in part 2 to come.
If you enjoy reading this sort of thing, do take a look at some of the other completed restorations I’ve done in the past by clicking on “Restoration Archive” at the top of the page.
Thanks for reading – see you next week.
Tony


Nice job so far Tony
LikeLike
Inspired by this and my love for a good game of Robotron, coupled with no robotron cabinet in my collection, I have decided to scratch build a cabaret all of my own.
Stand by for plenty of questions…..
LikeLiked by 1 person
Hello – I have a Robotron original Cocktail table if anyone is interested. Located in the City of Chicago
LikeLike